Người dùng thường gặp phải sự cố này sau khi cố gắng cập nhật Windows 10 qua Windows Update (WU). Lỗi 0x8024a105báo hiệu sự cố với các thành phần Cập nhật Tự động .Thông thường, sau khi cập nhật không thành công, người dùng sẽ thấy thông báo sau:
“Đã xảy ra sự cố khi tải xuống một số bản cập nhật, nhưng chúng tôi sẽ thử lại sau. Nếu bạn vẫn thấy thông báo này, hãy thử tìm kiếm trên web hoặc liên hệ với bộ phận hỗ trợ để được trợ giúp. Mã lỗi này có thể hữu ích: (0x8024a105). ”

Nếu bạn hiện đang gặp khó khăn với vấn đề này, chúng tôi đã quản lý để xác định một số bản sửa lỗi khả thi đã giúp thành công những người dùng trong tình huống tương tự như bạn. Vui lòng làm theo từng phương pháp dưới đây để cho đến khi bạn gặp phải giải pháp có thể giải quyết được sự cố của mình.
Phương pháp 1: Chạy trình gỡ rối Windows Update
Hãy bắt đầu đơn giản bằng cách chạy trình gỡ rối Windows Update . Một số người dùng đã quản lý để cho phép các bản cập nhật thông qua bằng cách cho phép trình khắc phục sự cố tích hợp tự động sửa các thành phần bị hỏng. Dưới đây là hướng dẫn nhanh về cách chạy Trình gỡ rối Windows Update :
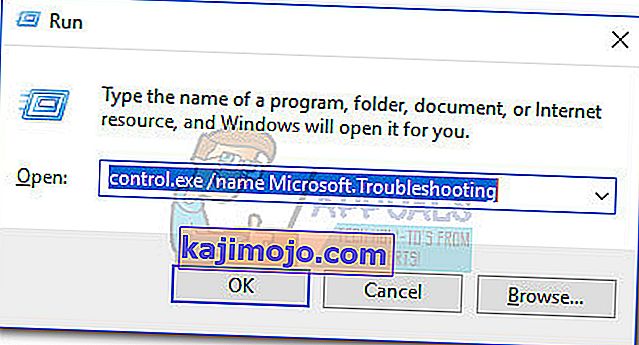
- Nhấn phím Windows + R để mở cửa sổ Run. Nhập hoặc dán phần sau.
control.exe / tên Microsoft. Xử lý sự cố
Nhấn Enter để mở trình khắc phục sự cố được tích hợp sẵn.
- Trong cửa sổ Khắc phục sự cố , nhấp vào Windows Update , sau đó nhấp vào Chạy trình khắc phục sự cố .
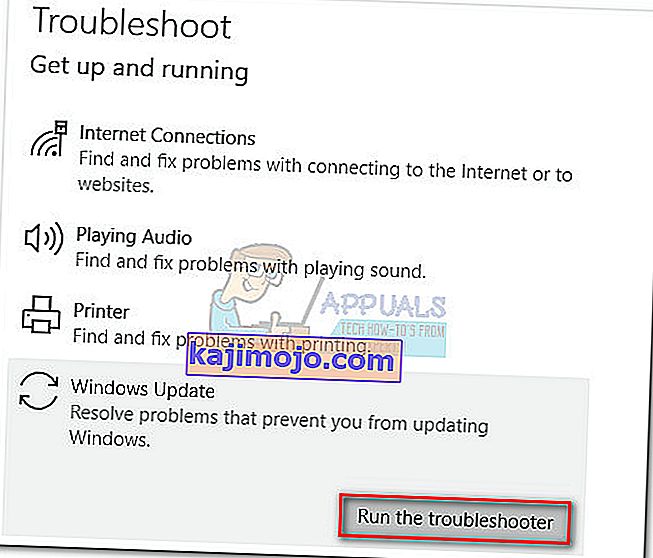
- Chờ cho đến khi trình khắc phục sự cố phát hiện ra sự cố với ứng dụng khách đang cập nhật của bạn. Nếu nó quản lý để xác định bất kỳ vấn đề nào với nó, hãy làm theo lời nhắc trên màn hình để kích hoạt sửa chữa tự động. Thông thường, bạn sẽ chỉ cần chọn Áp dụng bản sửa lỗi này .
- Nếu Trình khắc phục sự cố cập nhật báo cáo rằng nó đã sửa chữa được bất kỳ thứ gì, hãy khởi động lại máy tính của bạn và xem sự cố có được giải quyết ở lần khởi động tiếp theo hay không.


Nếu các bản cập nhật vẫn không thành công với lỗi 0x8024a105 , hãy chuyển xuống Phương pháp 2.
Phương pháp 2: Thay đổi Cài đặt Kiểm soát Tài khoản Người dùng (UAC)
Nếu trình khắc phục sự cố không tự động khắc phục sự cố, hãy xem liệu sự cố có phải do cài đặt Kiểm soát tài khoản người dùng tạo ra hay không . Hóa ra, một số bản cập nhật không thành công với lỗi 0x8024a105 vì tài khoản đã đăng nhập không có các quyền cần thiết. Bạn có thể khắc phục sự cố này một cách dễ dàng bằng cách thay đổi quyền của Tài khoản Người dùng liên quan đến tài khoản của bạn thành Quản trị viên. Đây là hướng dẫn nhanh để thực hiện việc này:
- Nhấn phím Windows + R để mở cửa sổ Run. Nhập hoặc dán “ netplwiz ” và nhấn Enter để mở trình gỡ rối tích hợp sẵn.
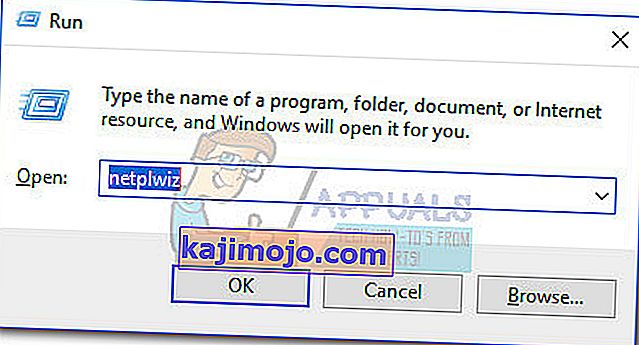
- Trong tab Người dùng , chọn người dùng mà bạn đang sử dụng và nhấp vào Thuộc tính.
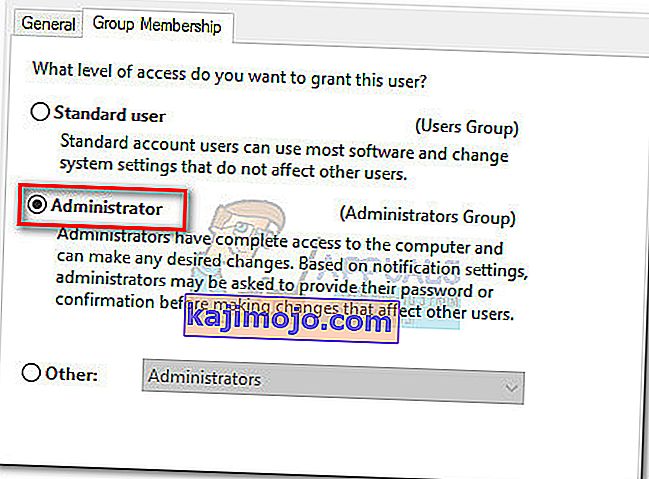
- Trong cửa sổ Thuộc tính , chuyển đến Tư cách thành viên nhóm và đặt cấp độ truy cập cho Quản trị viên . Nhấn Áp dụng để lưu các thay đổi của bạn.
 Lưu ý: Nếu cấp độ truy cập đã được đặt thành Quản trị viên , hãy chuyển trực tiếp sang Phương pháp 3 .
 - Khởi động lại máy tính của bạn và đảm bảo rằng bạn đăng nhập bằng cùng một tài khoản người dùng. Sau khi khởi động xong, hãy thử thực hiện lại các bản cập nhật. Nếu bạn thấy chúng không thành công với lỗi 0x8024a105 , hãy chuyển xuống phương pháp thứ ba.

 Lưu ý: Nếu cấp độ truy cập đã được đặt thành Quản trị viên , hãy chuyển trực tiếp sang Phương pháp 3 .
Phương pháp 3: Đặt lại các thành phần Windows Updates theo cách thủ công
Nếu các phương pháp trên được chứng minh là không thành công, chúng tôi không có lựa chọn nào khác ngoài việc đặt lại thủ công Cấu phần Cập nhật Windows và sau đó khởi động lại quá trình Windows Update . Trong số bốn phương pháp nổi bật, phương pháp này có xác suất thành công cao hơn nhưng yêu cầu điều chỉnh nhiều hơn.
Dưới đây là hướng dẫn nhanh để đặt lại các thành phần Windows Updates:
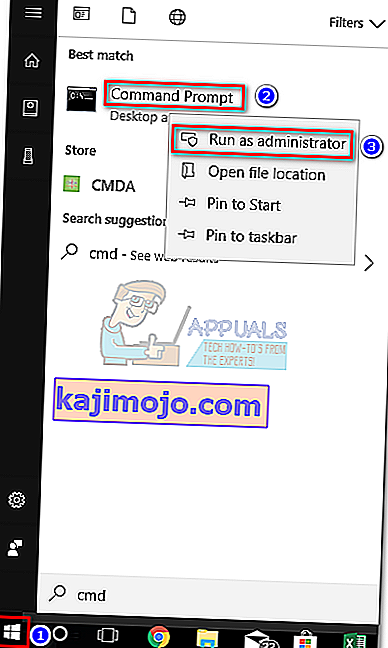
- Nhấp vào thanh Start của Windows (góc dưới bên trái) và tìm kiếm “ cmd ”. Sau đó, nhấp chuột phải vào Command prompt và chọn Run as Administrator .
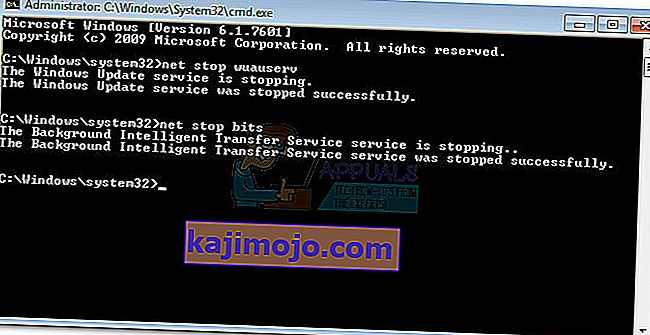
- Trong Command Prompt nâng cao, chúng tôi sẽ dừng các dịch vụ của MSI Installer, Windows Update, BITS và Cryptographic . Để thực hiện việc này, hãy chèn các lệnh sau và nhấn Enter sau mỗi lệnh:
net stop wuauserv net stop cryptSvc net stop bits net stop msiserver
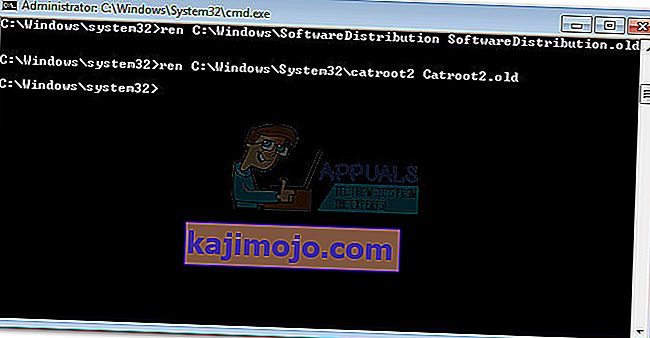
- Khi tất cả các dịch vụ đã bị dừng, hãy đổi tên thư mục SoftwareDistribution và thư mục Catroot2 để buộc Windows Update khởi động lại các thành phần của nó. Dán hoặc nhập hai lệnh vào dấu nhắc Lệnh nâng cao và nhấn Enter sau mỗi lệnh:
ren C: \ Windows \ SoftwareDistribution SoftwareDistribution.old
ren C: \ Windows \ System32 \ catroot2 Catroot2.old
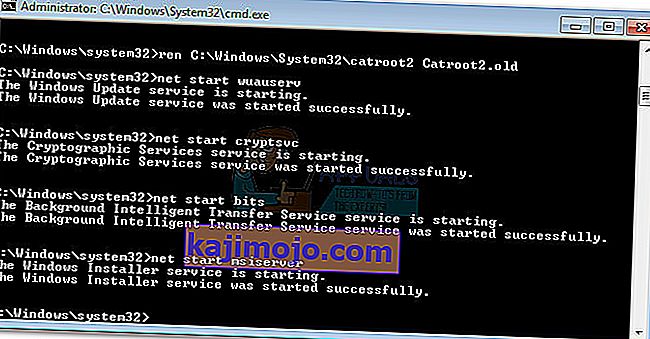
- Sau khi hai thư mục đã được đổi tên, đã đến lúc khởi động lại các dịch vụ của MSI Installer, BITS, Cryptographic và Windows Update. Để thực hiện việc này, hãy nhập lệnh sau vào Command Prompt và nhấn Enter sau mỗi lệnh:
net start wuauserv net start cryptSvc net start bits net start msiserver
- Khi các dịch vụ đã được khởi động lại, hãy đóng Dấu nhắc lệnh nâng cao và khởi động lại máy tính của bạn.


Phương pháp 4: Xóa thư mục phân phối phần mềm
Trong một số trường hợp, sự cố có thể được khắc phục đơn giản bằng cách xóa một thư mục bằng Powershell. Do đó, trong bước này, đầu tiên, chúng tôi sẽ chạy PowerShell với tư cách quản trị viên và sau đó chúng tôi sẽ xóa thư mục Phân phối phần mềm để bắt đầu quá trình cập nhật. Vì điều đó:
- Press “Windows” + “X” buttons simultaneously and select the “Power Shell(Admin)” option.
- Type in the following command and press “Enter” to execute it.
net stop wuauserv
- Again, type in the following command and press “Enter”.
net stop bits
- Lastly, navigate to the following folder.
C:\Windows\SoftwareDistribution
- Press “Ctrl” + “A” to select all the contents of the folder and press “Shift” + “Del” button to delete them permanently.

- Confirm any prompts that warn you about deleting these files and then reboot your computer to complete the process.
- Now, try to update and check to see if the issue persists.

Once your computer boots back up, see whether you are able to install the updates without the 0x8024a105 error. If you do, try to perform an SFC scan to fix any issues with missing files or drivers.
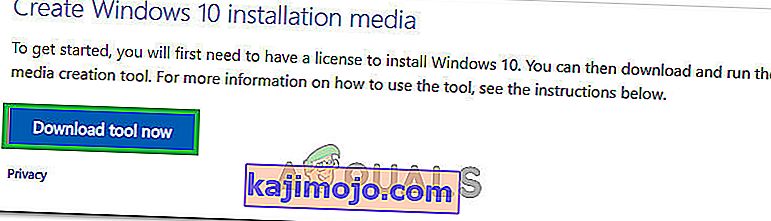
Method 5: Update Using Media Creation Tool
In some cases, you might be unable to update your computer using the default Windows Update process because your Windows might not be able to establish a proper connection with the Update servers. Therefore, in this step, we will be deploying the Windows Media Creation Tool to perform the update for us. It will automatically download and install the update files to upgrade our Windows. For that:
- Download the Windows Media Creation Tool from here.
- Run the executable and follow with the on-screen instructions for the initial setup.
- After the initial setup, select the “Upgrade this PC” option and click on “Next”.
- Accept the License terms and let the installer run.
- The tool will now automatically grab the update files from the servers and update your computer to the latest version available.
- Check to see if doing so has fixed the error.

Method 6: Delete Download Folders
When a new update is downloaded, it is generally stored in some folders on the computer. In this step, we will be deleting some of these folders and which will prompt the operating system to go ahead and download new files which can sometimes clear out the error and the update will be applied normally. For that:
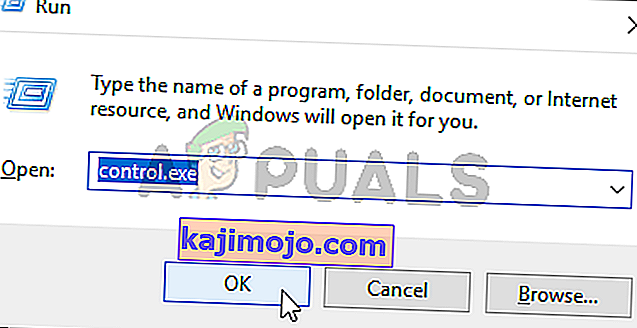
- Press “Windows” + “R” to open the Run prompt.
- Type in “Control Panel” and press “Enter” to launch the classical control panel interface.
- In the Control Panel, click on the “View By:” option and select “Large Icons” from the list.
- Click on the “File Explorer Options” and a new window should pop up.
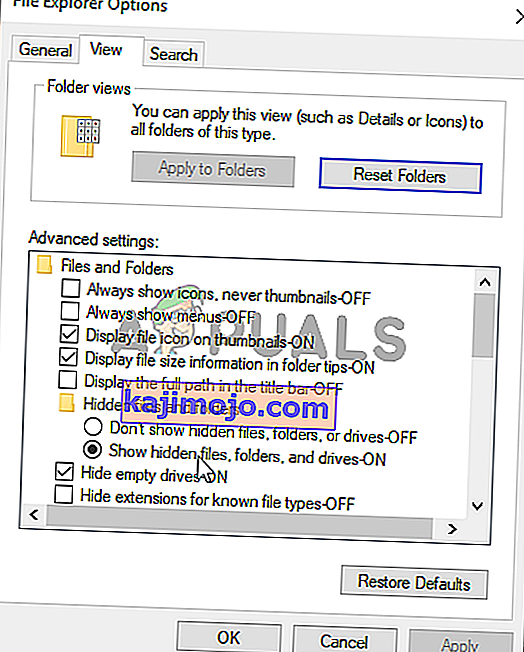
- In the File Explorer Options, click on the “View” button and then double click on the “Files and Folders” button to expand it.
- After that, double click on the ‘Hidden Files and Folders” to expand it as well.
- Check the “Show hidden Files, Folders and Drives” option and click on “Apply” to save your changes.
- Click on “OK” to close out of the window and press “Windows’ + “E” to launch the file explorer.
- In the File Explorer, delete the “$Windows.~WS” and “$Windows. ~BT” folders.
- Make sure to clear out the recycle bin as well so that they cannot be recovered.
- After this, press “Windows’ + “I” to launch settings and click on the “Update and Security” option.

- In Update and Security, click on the “Windows Update” option on the left pane and then click on the “Check for Updates” button.
- Updates will now automatically be downloaded and installed.
- Check to see if the issue persists.


Method 7: Resetting Catroot2 Folder
In some cases, it is possible that the Catroot2 folder and its files have either been corrupted or they have been misconfigured due to which this issue is being triggered. Therefore, in this step, we will first be making some changes from the command prompt and then we will delete the files inside that folder. For that:
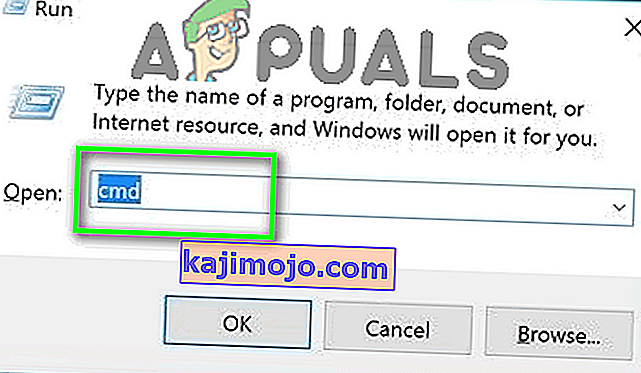
- Press “Windows’ + “R” to launch the run prompt.
- Type in “cmd” and then press “Shift” + “Ctrl” + “Enter” to provide administrative privileges.
- Type in the following command and press “Enter” to execute it.
net stop cryptsvc
- After you have stopped the cryptsvc using the command above, type in the following commands into the command prompt one by one and press “Enter” after each to execute them on your computer.
md %systemroot%system32catroot2.old xcopy %systemroot%system32catroot2 %systemroot%system32catroot2.old /s
- After executing the commands stated above, we will be deleting all the files from the catroot folder without deleting the folder itself.
- Press “Windows’ + “R” to open the Run prompt and type in the following address to navigate to the catroot folder.
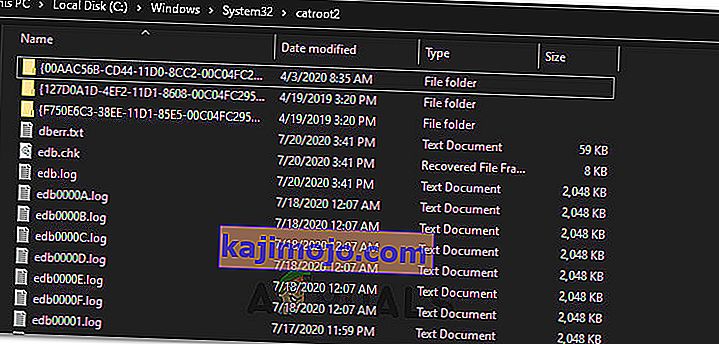
C:/Windows/System32/catroot2
- Press “Ctrl” + “A” once inside the folder to select all items inside it and press “Shift” + “Delete” to remove them from your computer.
- After removing these, confirm any prompts that might spring up on your screen.
- After that, open the command prompt back up and execute the following command.
net start cryptsvc
- Try to update your computer and check to see if the issue still persists.


Method 8: Configuring Services to Start Automatically
Sometimes, your computer might be preventing certain services from starting and functioning in the background due to which the update might not be properly installed or configured to be applied on your computer. Therefore, in this step, we will be setting up some services to startup automatically. For that:
- Press “Windows’ + “R” to launch the Run prompt.
- Type in “cmd” and press “Ctrl” + “Shift” + “Enter” to provide admin permissions.

- Type in the following commands one by one in the command prompt and press “Enter” after each to execute them.
SC Config wuauserv start=auto SC Config bits start=auto SC Config cryptsvc start=auto SC Config trustedinstaller start=auto
- This way, we will have configured these services to startup and run automatically in the background.
- Check to see if the issue persists.

Method 9: Re-register Windows Update and BITS Files
It is possible that some windows update files and Bits files might not be properly registered on your computer. Therefore, in this step, we will be re-registering these files on the computer and then we will check to see if that fixes our issue. For that:
- Press “Windows’ + “R’ to open the Run prompt.
- Type in “cmd” and then press the “Ctrl” + “Shift” + “Enter” buttons to provide admin permissions.

Type in the following commands one by one and press “Enter” after each to register the components.regsvr32.exe atl.dll regsvr32.exe urlmon.dll regsvr32.exe mshtml.dll regsvr32.exe shdocvw.dll regsvr32.exe browseui.dll regsvr32.exe jscript.dll regsvr32.exe vbscript.dll regsvr32.exe scrrun.dll regsvr32.exe msxml.dll regsvr32.exe msxml3.dll regsvr32.exe msxml6.dll regsvr32.exe actxprxy.dll regsvr32.exe softpub.dll regsvr32.exe wintrust.dll regsvr32.exe dssenh.dll regsvr32.exe rsaenh.dll regsvr32.exe gpkcsp.dll regsvr32.exe sccbase.dll regsvr32.exe slbcsp.dll regsvr32.exe cryptdlg.dll regsvr32.exe oleaut32.dll regsvr32.exe ole32.dll regsvr32.exe shell32.dll regsvr32.exe initpki.dll regsvr32.exe wuapi.dll regsvr32.exe wuaueng.dll regsvr32.exe wuaueng1.dll regsvr32.exe wucltui.dll regsvr32.exe wups.dll regsvr32.exe wups2.dll regsvr32.exe wuweb.dll regsvr32.exe qmgr.dll regsvr32.exe qmgrprxy.dll regsvr32.exe wucltux.dll regsvr32.exe muweb.dll regsvr32.exe wuwebv.dll
- After executing the commands listed above, check to see if the issue still persists.

Note: After trying the following fixes, if the issue still persists, try to perform a clean boot and check if that fixes it. If it does, update in the clean boot and then get out of it after the update is completed. If that doesn’t work, try to go for a clean install of Windows.