Steam Cloud cung cấp một cách dễ dàng và minh bạch để lưu dữ liệu trò chơi của bạn trên hệ thống lưu trữ từ xa. Các tệp được chỉ định trong cấu hình Đám mây tự động hoặc nếu chúng được ghi vào đĩa sẽ tự động được sao chép sang máy chủ đám mây Steam (sử dụng API đám mây) sau khi trò chơi tồn tại.

Điều này đặc biệt hữu ích nếu người dùng thay đổi máy tính của mình. Tiến trình trò chơi sẽ được tiếp tục bằng API đám mây hoặc đọc trực tiếp từ đĩa. Các tệp sẽ được tự động tải xuống trước khi trò chơi được khởi chạy vì bạn đã nhập thông tin đăng nhập Steam của mình. Công việc chính của Steam Cloud là đảm bảo rằng tất cả các tệp được đồng bộ hóa trên tất cả các máy tính mà người dùng đang sử dụng.
Người dùng có tùy chọn vô hiệu hóa toàn bộ đồng bộ hóa Đám mây có trong Cài đặt Steam trong ứng dụng khách. Người dùng cũng có thể linh hoạt tắt tính năng đồng bộ hóa Đám mây cho mỗi trò chơi. Nhưng trước khi tiếp tục với các giải pháp, hãy cập nhật ứng dụng khách Steam lên phiên bản mới nhất.
Các phương pháp khác nhau để sử dụng đám mây hơi nước là gì?
Steam cung cấp hai phương pháp khác nhau để sử dụng Steam Cloud.
Đầu tiên là API Steam Cloud. API đám mây cung cấp một loạt các chức năng cho phép bạn tích hợp trực tiếp Steam Cloud vào trò chơi của mình. Cloud API cũng thực hiện nhiệm vụ cô lập các tệp người dùng Steam riêng lẻ với nhau và cũng cung cấp khả năng kiểm soát tốt hơn đối với toàn bộ Steam Cloud.
Thứ hai là Steam Auto-Cloud. Tính năng này chủ yếu được thiết kế cho các trò chơi cũ khó sử dụng Cloud API. Đây là một cách nhanh chóng để bắt đầu với Steam Cloud nhưng nó thiếu tính linh hoạt và sức mạnh mà API Steam Cloud cung cấp.
Các nhà phát triển khuyến nghị sử dụng Cloud API thay vì Steam Auto-Cloud vì nó cung cấp khả năng tích hợp và tùy chỉnh sâu hơn và hiệu quả hơn. Nó cho phép bạn tận dụng tối đa đám mây Steam.
Làm cách nào để giải quyết xung đột trên Steam Cloud?
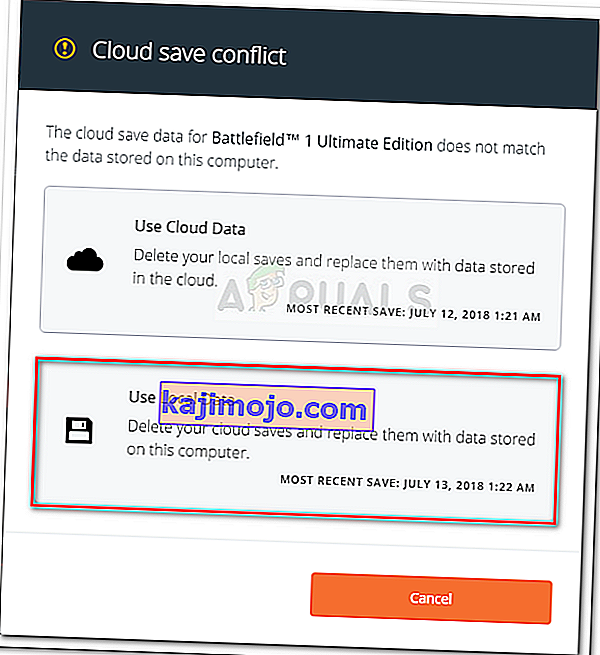
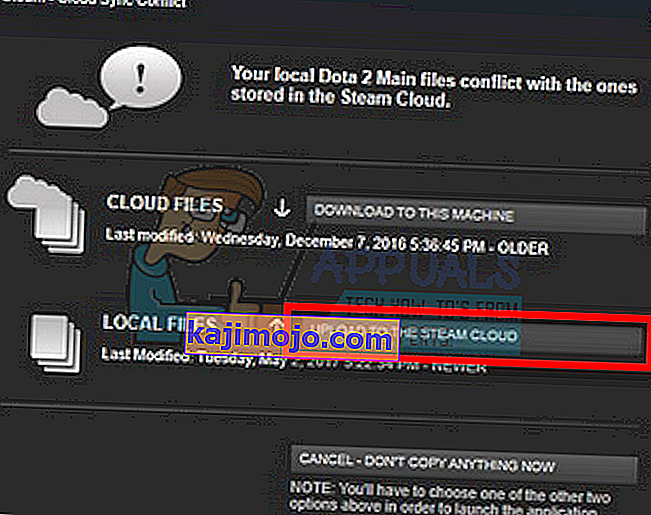
Xung đột Steam Cloud xảy ra khi nội dung Steam Cloud không khớp với các tệp trò chơi cục bộ được lưu trữ trên ổ cứng của bạn. Điều này có thể xảy ra trên máy bạn đang sử dụng tại thời điểm đó hoặc có thể đã xảy ra trên máy khác trước đó. Vì tệp đã được sửa đổi ở hai vị trí khác nhau mà không có sự đồng bộ giữa chúng, Steam không thể xác định tệp nào sẽ giữ lại.

Rất có thể bạn sẽ chọn tệp đã được sửa đổi gần đây nhất. Có nghĩa là những diễn biến mới nhất trong trò chơi của bạn sẽ được lưu lại. Bạn nên kiểm tra cẩn thận dữ liệu được xem trước trong cửa sổ. Xem kỹ ngày và giờ của bối cảnh và tương ứng với lần cuối cùng bạn chơi trò chơi trên Steam. Bối cảnh này có thể giúp bạn xác định phiên bản nào cần giữ lại.
Lưu ý rằng chơi trò chơi ở chế độ ngoại tuyến sẽ khiến trò chơi của bạn không đồng bộ hóa và đây là nguyên nhân có thể xảy ra nhất của xung đột Steam Cloud.
Điều gì sẽ xảy ra nếu Steam không thể đồng bộ hóa tệp với đám mây?
Lỗi này cho biết rằng Steam không thể đồng bộ hóa các tệp cục bộ của bạn với Steam Cloud. Đây có thể là một vấn đề tạm thời mà các máy chủ Steam Cloud có thể gặp phải. Bạn có thể kiểm tra trạng thái Steam Cloud từ trang web Steam để đảm bảo rằng vấn đề nằm ở phía họ.

Nếu dịch vụ đám mây Steam hoạt động hoàn hảo, điều đó có nghĩa là vấn đề nằm ở cuối bạn. Bạn có thể kiểm tra kết nối Steam của mình và khắc phục sự cố. Bạn cũng có thể kiểm tra xem chỉ mình bạn có gặp sự cố khi đồng bộ hóa với Steam Cloud hay không.
Nếu bạn bỏ qua thông báo và nhấp vào “Chơi trò chơi”, điều đó có thể gây ra xung đột tiềm ẩn giữa các tệp cục bộ của bạn và Steam Cloud. Nó cũng có thể dẫn đến mất tiến độ và dữ liệu trò chơi.
Điều gì sẽ xảy ra nếu tôi bị mất tệp hoặc tiến trình sau khi chuyển sang máy tính khác?
Nếu bạn đang bỏ lỡ tiến trình gần đây nhất của mình và đã kiểm tra kỹ xem trò chơi đang sử dụng Steam Cloud bằng Cài đặt, điều đó có nghĩa là Steam không thể đồng bộ hóa dữ liệu của bạn thành công hoặc quá trình đồng bộ hóa dẫn đến dữ liệu trước đó của bạn được tải lên Đám mây.
Có thể tệp gốc của bạn hoặc tiến trình vẫn còn trên máy cũ hơn và không thể đồng bộ hóa. Có thể nếu bạn khởi chạy Steam trên máy tính đó, tiến trình của bạn sẽ hiển thị. Nếu có, nó sẽ tự động được cập nhật trên tất cả các máy khác được kết nối với tài khoản Steam của bạn.
Ngoài ra, nhiều trò chơi không sử dụng tiện ích của Steam Cloud. Bạn có thể kiểm tra trang chính thức của trò chơi nếu có hỗ trợ Steam Cloud. Nếu không và bạn không có quyền truy cập vào máy cũ hơn, điều đó có nghĩa là tiến trình của bạn bị mất và không có cách nào để khôi phục lại.
Làm cách nào để xóa các tệp được lưu trữ trong máy chủ Steam Cloud?
Steam Cloud được sử dụng để sao lưu từng tiến trình trong trò chơi của bạn để bạn không bị mất tiến trình của mình nếu truy cập trò chơi từ bất kỳ máy tính nào khác. Bạn có thể xác nhận rằng tiến trình của bạn đang được Cloud lưu bằng phương pháp sau.
Kiểm tra xem trò chơi của bạn có được sao lưu hay không.
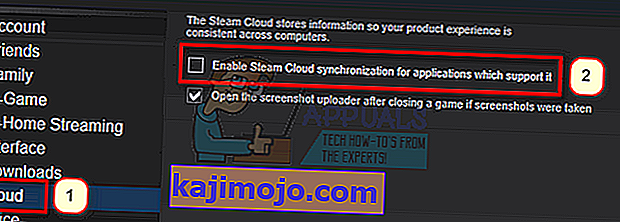
- Mở ứng dụng khách Steam của bạn . Mở Cài đặt của nó bằng cách nhấn vào nút Steam ở góc trên cùng bên trái của cửa sổ và chọn tùy chọn.
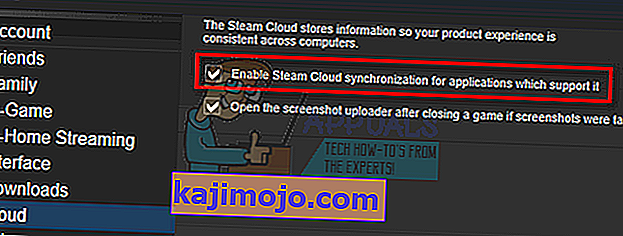
- Mở tab Đám mây ở bên trái màn hình. Kiểm tra xem tùy chọn “ Bật đồng bộ hóa Steam Cloud cho các ứng dụng hỗ trợ nó ” có được chọn hay không.
- Tiếp theo, nhấp vào tab Thư viện hiện ở phía trên cùng của ứng dụng khách Steam. Tại đây tất cả các trò chơi của bạn sẽ được liệt kê.
- Nhấp chuột phải vào trò chơi và chọn Thuộc tính . Sau đó, điều hướng đến tab Cập nhật có ở đầu cửa sổ.
- Ở cuối cửa sổ, bạn sẽ thấy tùy chọn “ Bật đồng bộ hóa Steam Cloud cho [tên trò chơi] ”. Đảm bảo rằng các tùy chọn được kiểm tra .


Nếu bạn đã bật cả hai tùy chọn, điều đó có nghĩa là trò chơi của bạn đang được sao lưu bởi Steam Cloud và chúng tôi cũng có thể xóa dữ liệu.
Cơ chế sao lưu là gì?
Điều đầu tiên bạn nên biết là có ba phiên bản của dữ liệu trò chơi đã lưu
- Phiên bản gốc được lưu trữ trong thư mục AppData ( D1 ).
- Phiên bản đám mây được lưu trữ ở vị trí Steam / userdata / SteamID / AppID ( D2 ).
- Phiên bản đám mây được lưu trữ trong các máy chủ đám mây của Steam ( D3 ).
Hãy lưu ý các chú thích (D1, D2, D3) mà chúng tôi đã sử dụng vì chúng tôi sẽ đề cập đến chúng rất nhiều trong tương lai.
Khi bạn bắt đầu trò chơi lần đầu tiên, D1 được tạo tự động. Sau khi bạn chơi trò chơi xong, dữ liệu trò chơi được cập nhật trong D1 và tự động sao chép vào D2. Sau đó D2 này được đồng bộ hóa với D3, do đó tải lên tất cả nội dung trò chơi của bạn.
Nếu bạn bắt đầu trò chơi của mình từ một máy tính khác lần đầu tiên, nếu Steam có D3 trên máy chủ của nó nhưng không phát hiện thấy D2 trên máy tính, nó sẽ tự động tải xuống dữ liệu và sao chép D3 sang D2. Steam Cloud cũng tự động tải xuống dữ liệu bị thiếu bất cứ khi nào bạn khởi động Steam.
Tóm lại, dữ liệu quan trọng nhất đối với chúng tôi là D2. Nếu chúng tôi có thể thao tác nó, chúng tôi có thể xóa thành công dữ liệu mà bạn muốn xóa.
Lưu ý: Một số trò chơi không có D1 và chúng trực tiếp lưu dữ liệu của mình vào D2. Trong khi một số trò chơi không sử dụng D2 làm phương tiện và tải dữ liệu lên Đám mây trực tiếp từ D1.
What Are the Userdata Contents?
In the directory Steam/userdata, you should have a folder corresponding to your SteamID (You check what your Steam ID is by reading our article on it). After you open it, there will folders made for each game that you play. They will be identified using their AppID (AppID can be easily checked by visiting the game in the Steam store and extracting it from the URL). In this game folder, you will find two entities.
- remotecache.vdf: This file describes all the properties of files that are contained in the remote folder.
- Remotefolder. This contains all the files which are synced with your Steam Cloud server.
Deleting Data from Cloud
In this method, we will be following two important steps. We will first bring up the Steam Cloud conflict notification and then delete the Cloud files.
Do note that you would have to follow these steps game by game to delete all of the Steam cloud content.
First, we need to delete the AppID folder from your Steam directory. After you restart your computer and Steam, Steam will automatically re-create the folder. We need to perform this step to ensure that the Steam Cloud is working perfectly and we can go ahead with the part of deletion.
- Open your Steam directory. The default location for your Steam installation is
C:\Program Files (x86)\Steam
- Search for a folder of AppID and Delete it. Then restart your computer and Steam. Start a game for a few minutes. Make sure that you have a working internet connection.
- Navigate back to the Steam directory and check if the AppID folder is back. If it is, it is confirmed that your Steam Cloud is working perfectly and we can proceed with the method.
Bringing Up Steam Cloud Conflict Dialogue
The first part of the solution is probably the most difficult. To delete all your Steam Cloud data, it is necessary to bring the conflict dialogue. Without it is not possible to delete the data present in your Cloud. Steam Cloud conflict occurs when the Cloud files differ from the data present on your hard drive.
There are two methods to bring about this conflict:
Method 1:
- Make sure that your Steam Cloud is enabled by following the steps mentioned above. Exit Steam completely by ending all the processes starting with Steamclientbootstrapper using the task manager.
- Now will alter all the files in the location
Steam\userdata\SteamID\AppID\remote
The objective is to make sure that all the files are different from those uploaded to the Steam cloud. We can’t simply delete the files from this location as Steam will automatically notice that the files are missing and download the same ones from the Cloud servers. We can achieve our task by corrupting them and making them 0-byte files.
- Navigate to
Steam\userdata\SteamID\AppID\remote
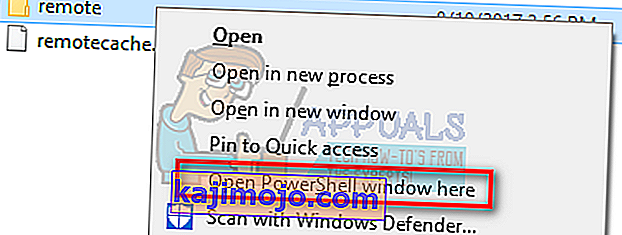
- Now hold shift and right-click on your remote folder. Select the option “Open PowerShell window here”.
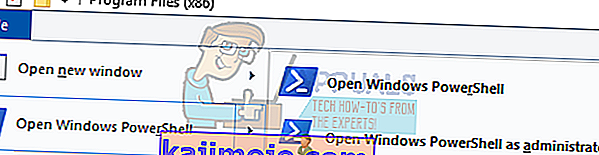
- You can also open PowerShell when in the folder by clicking the File option present at the top left side of the screen and selecting “Open Windows PowerShell as administrator”.
- Once PowerShell is opened, type the exact text written below


clc –path “C:\Program Files (x86)\Steam\userdata\SteamID\AppID\remote\*"
If you fail to write the correct code, you will get an error like this

If you correctly type in the line there will be no confirmatory message and you will get a window like this.

Start your Steam and there will be the conflict windows present on your Steam client.
Method 2:
This is an easier method as compared to the earlier one but it isn’t that efficient.
- Open your Steam client. Open its Settings by pressing the Steam button present at the top left corner of the window and selecting the option.
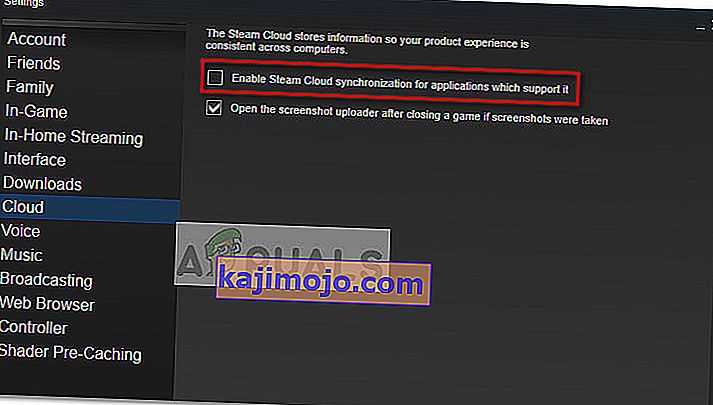
- Open the Cloud tab present on the left side of the screen. Uncheck the option “Enable Steam Cloud synchronization for the applications which support it”.

- Now navigate to your Stream directory as you did earlier and delete all files present in the folder of AppID. The file path for deletion is
Steam\userdata\SteamID\AppID.
- Now start the game to make new and different files in the file location.
- Exit the game and Steam completely by ending all Steam processes in the task manager (end steamclientbootstrapper first).
- Now delete the remotecache.vdf file present in the location
Steam\userdata\SteamID\AppID
- Start your Steam.
- Head over to the client’s Settings and enable the cloud.

Now a Steam conflict dialogue will come forth and we can proceed with the remaining method.
Deleting Cloud files
Once the Cloud conflict error is forth, don’t click any option and follow the instructions below.
- Navigate to the following file path
Steam\userdata\SteamID\AppID
and delete all the files in it. There will be two files (remote folder and remotecache.vdf). Delete both of them.

- Now go back to the conflict window and select the option of “Upload to the Steam Cloud”. Now Steam will sync your AppID folder while there will be nothing in it and the previous data on your Steam Cloud will be deleted.
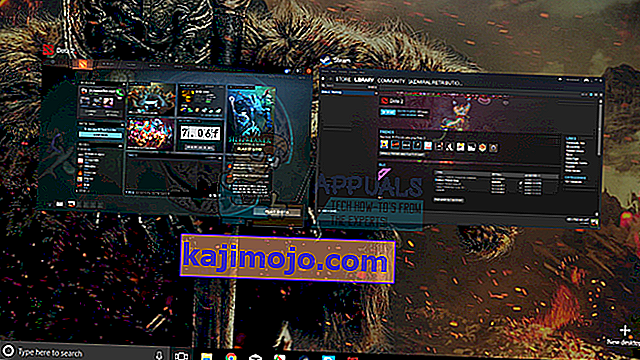
- Now the game will start automatically but it will create new files that will be synced to your Steam cloud when you close it. We can prevent it from happening by pressing alt + tab. This will open the open windows on your screen. Select the Steam client from the list of windows.
- Once you are in the Steam client, open the client’s Settings. Navigate to the Cloud tab and uncheck the line which enables cloud.
- Now return to the game and exit. No files will be synced to your Steam cloud.
- Exit Steam and delete the AppID folder as we did before.


How to Make Sure If it Worked?
Remember how we checked at the beginning of this method if the Steam Cloud was running as expected by deleting the AppID folder and checking if it was made again. If there is no file present in the Steam cloud, there will be no file downloaded to your computer.
- Enable the Steam cloud as we did in the guide.
- Exit Steam completely by using the task manager.
- Delete the AppID folder (if you didn’t in step 2).
- Now check D3 (these are the cloud files) and compare them with D2 (local files on your computer). If there is nothing in D3, there will be nothing in D2 too!
- Check the following directory Steam\userdata\SteamID
No new AppID folder would have been created.
You can also check by logging Steam in on another computer and checking if the files exist.
If you make it till here without any problems, you have successfully deleted all the files on your Steam Cloud.
How to Delete Steam Cloud Saves from OS X
The procedures above can also be replicated on OS X and older Macs to a slight extent. By following the steps below, you will be able to delete your local saves. You can then disable the Steam Cloud synchronization from the Steam application, start a new game and create a few new saves. Then, when you return to re-enable the Steam Cloud synchronization features, the client will ask you which saves do you want to use. You can then choose the new ones which will delete and replace your old saves from the cloud.
To make things even clearer, here’s a step-by-step guide through the whole thing:
- Open your Steam application and go to Steam > Settings via the ribbon at the top of the window.
- In the settings menu, click on the Cloud tab and uncheck the box associated with Enable Steam Cloud synchronization for applications that support it.
- Close Steam completely and open your Finder app.
- Go to Library > Application Support > Steam > SteamApps > Common and open the folder of whichever game you want to delete the save files.
- Next, open the SAVE folder to reveal the saves of the game.
Note: If the location specified above doesn’t land you to the save files, try the following locations but mind the placeholders:
Users / *Your username* /Library / Application Support / *Game Folder* / Game Documents / *Game* / GameSaves Users/ *Your username* / Library / Application Support / Steam / userdata / *GameNumber* / remote Users/ *Your username* / Library / Containers / *Game Folder* / Data /Library / Application Support / *Game* / GameDocuments / *Game* / gamesaves
- Once you manage to identify and delete the local saves from the game you’re targeting, open the Game and create a few new saves.
- Exit the game, open steam and return to Steam > Settings > Cloud. From the cloud tab, re-enable the checkbox next to Enable Steam Cloud synchronization for applications which support it and click the OK button below.
- Steam will ask you whether you want to use the newly created local saves or the ones that you already have on the cloud. Choosing to use the new ones will delete the old saves that you currently have on Steam Cloud.