Lỗi “ Raw-mode không khả dụng do Hyper-V ( VERR_SUPDRV_NO_RAW_MODE_HYPER_V_ROOT )” xuất hiện cho VirtualBox khi họ cố gắng khởi chạy một máy ảo. Đối với một số người dùng, lỗi này xảy ra mặc dù thực tế là công nghệ Hyper-V đã bị vô hiệu hóa trên máy của họ.

Khi cố gắng khắc phục lỗi này, điểm dừng đầu tiên của bạn là đảm bảo rằng Hyper-V không được bật trong Tính năng của Windows. Nếu nó đã bị vô hiệu hóa, các thủ phạm tiềm ẩn khác có thể là kiểm tra siêu giám sát được bật, Bảo vệ thiết bị được kích hoạt (Bảo vệ thông tin xác thực) hoặc một số loại can thiệp được hỗ trợ bởi tính năng bảo mật của Bộ bảo vệ Windows có tên là Core Isolation.
Tuy nhiên, trên các cấu hình máy cũ hơn, bạn cũng có thể gặp lỗi này do ảo hóa phần cứng bị vô hiệu hóa ở cấp BIOS hoặc UEFI.
1. Tắt công cụ quản lý Hyper-V
Nguyên nhân số một sẽ gây ra lỗi “ Chế độ thô không khả dụng do Hyper-V” là thực tế là Hyper-V đã được bật trên máy của bạn. Công nghệ ảo hóa độc quyền của Microsoft này cho phép tạo ra các máy ảo trên các hệ thống x86 và x64 chạy phiên bản Windows theo cách riêng.
Nhưng không có lựa chọn thay thế nào của bên thứ 3 như VirtualBox hoặc VMware đang sử dụng nó vì lý do ổn định. Thậm chí nhiều hơn, chúng đặc biệt từ chối hoạt động khi công nghệ này được kích hoạt. Tuy nhiên, Windows 10 hiện được lập trình để ưu tiên Hyper-V hơn một công nghệ ảo hóa tương tự.
Như bạn có thể tưởng tượng, điều này có khả năng tạo ra rất nhiều vấn đề, bao gồm cả mã lỗi VERR_SUPDRV_NO_RAW_MODE_HYPER_V_ROOT . Để khắc phục, bạn cần phải tắt Hyper-V để cho phép bên thứ 3 tiếp quản.
Và khi nói đến việc này, bạn có hai con đường phía trước. Bạn có thể làm điều đó trực tiếp từ thiết bị đầu cuối hoặc bạn có thể làm điều đó từ menu GUI Chương trình và Tính năng. Hãy làm theo bất kỳ cách tiếp cận nào bạn thích:
Tắt Hyper-V qua GUI
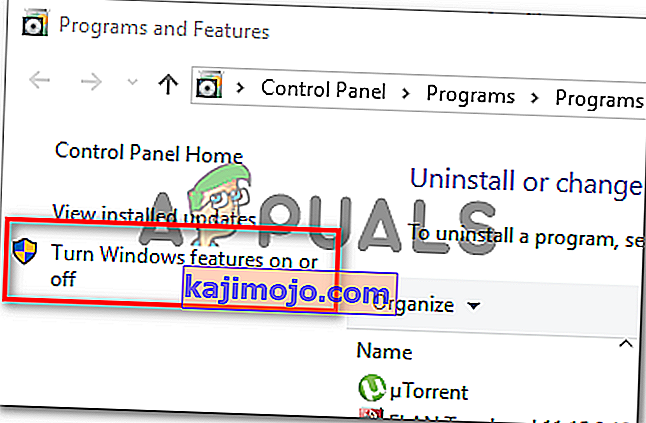
- Nhấn phím Windows + R để mở hộp thoại Chạy . Tiếp theo, gõ 'appwiz.cpl' và nhấn Enter để mở menu Chương trình và Tính năng .

- Khi bạn đang ở trong menu Chương trình và Tính năng , hãy sử dụng menu ở bên phải để nhấp vào Bật hoặc tắt các tính năng của Windows từ ngăn bên trái.
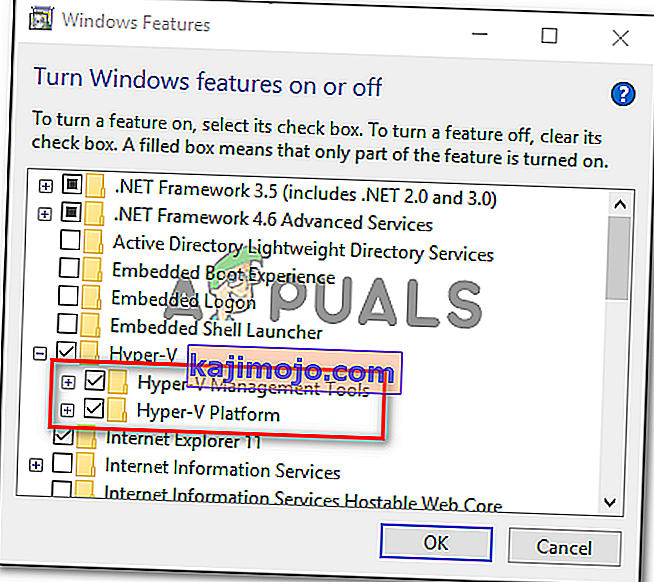
- Từ bên trong menu Tính năng của Windows , hãy tiếp tục và mở rộng thư mục Hyper-V . Sau đó, hãy chắc chắn để bỏ chọn hộp kết hợp với Công cụ Hyper-V Management và Hyper-V vBulletin trước khi cuối cùng nhấn OK .
- Chờ cho đến khi quy trình hoàn tất, sau đó khởi động lại máy tính của bạn và xem sự cố có được giải quyết sau lần khởi động tiếp theo hay không.


Tắt Hyper-V qua thiết bị đầu cuối CMD
- Nhấn phím Windows + R để mở hộp thoại Chạy . Tiếp theo, nhập 'cmd' bên trong hộp văn bản và nhấn Ctrl + Shift + Enter để mở Command Prompt nâng cao. Cuối cùng khi bạn nhìn thấy UAC (Kiểm soát tài khoản người dùng) , hãy nhấp vào Có để cấp đặc quyền quản trị.

- Sau khi bạn quản lý để tiến vào thiết bị đầu cuối CMD nâng cao, hãy nhập hoặc dán lệnh sau và nhấn Enter để tắt chức năng Hyper-V:
dism.exe / Trực tuyến / Tắt-Tính năng: Microsoft-Hyper-V
- Khi lệnh được xử lý thành công, hãy đóng cửa sổ CMD và khởi động lại máy tính của bạn.
- Ở lần khởi động tiếp theo, hãy lặp lại hành động khiến Chế độ thô không khả dụng do lỗi Hyper-V và xem sự cố hiện đã được giải quyết chưa.

Trong trường hợp thao tác này không cho phép bạn khắc phục sự cố, hãy làm theo hướng dẫn bên dưới để biết cách khắc phục sự cố khác.
2. Tắt kiểm tra Hypervisor
Hóa ra, bạn có thể gặp phải sự cố này ngay cả khi Hyper-V bị tắt. Một tình huống phổ biến có thể gây ra sự cố này là một trường hợp trong đó dịch vụ HyperVisorLaunchType được đặt thành TỰ ĐỘNG. Điều này sẽ buộc hệ thống của bạn phải kiểm tra các ứng dụng sử dụng VT-x trước mỗi lần khởi chạy máy ảo.
Một số người dùng bị ảnh hưởng đã cố gắng giải quyết vấn đề này bằng cách chạy tiện ích Bcdedit để kiểm tra trạng thái của HyperVisorLaunchType và vô hiệu hóa nó trong trường hợp nó được đặt thành Tự động.
Dưới đây là hướng dẫn nhanh về cách thực hiện việc này trên bất kỳ máy tính Windows nào:
- Nhấn phím Windows + R để mở hộp thoại Chạy. Tiếp theo, nhập 'cmd' bên trong hộp văn bản, sau đó nhấn Ctrl + Shift + Enter để mở thiết bị đầu cuối CMD nâng cao.
Lưu ý: Khi bạn đến UAC (User Account Control) , hãy nhấp vào Yes để cấp quyền truy cập quản trị viên.
- Khi bạn đang ở trong thiết bị đầu cuối CMD nâng cao, hãy nhập lệnh sau và nhấn Enter để kiểm tra trạng thái của HyperVisor:
bcdedit
Lưu ý : Trong trường hợp trạng thái của hypervisorlaunchtype được đặt thành Tắt, hãy bỏ qua các bước tiếp theo bên dưới và chuyển trực tiếp đến Phương pháp 3 .
- Sau khi có kết quả, hãy cuộn xuống phần hypervisorlaunchtype và xem trạng thái có được đặt thành Tự động hay không .
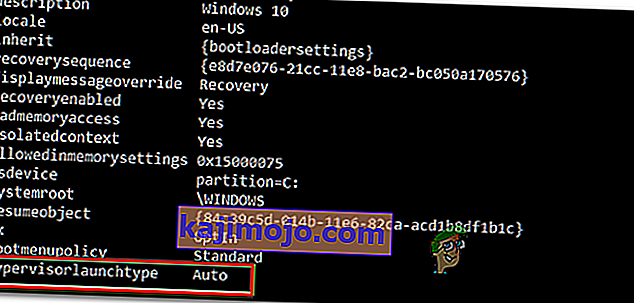
- Trong trường hợp trạng thái của hypervisorlaunchtype hiển thị Tự động , hãy nhập hoặc dán lệnh sau và nhấn Enter để đặt trạng thái thành Đã tắt :
bcdedit / tắt hypervisorlaunchtype
- Sau khi lệnh được xử lý thành công, hãy đóng thiết bị đầu cuối CMD nâng cao, sau đó khởi động lại máy chủ.
- Ở lần khởi động tiếp theo, hãy khởi chạy máy ảo VirtualBox và xem sự cố đã được giải quyết chưa.

Trong trường hợp sự cố tương tự vẫn tiếp diễn, hãy chuyển xuống bản sửa lỗi tiềm năng tiếp theo bên dưới.
3. Tắt bảo vệ thiết bị / bảo vệ thông tin xác thực
Những người dùng bị ảnh hưởng khác đã cố gắng khắc phục chế độ Raw không khả dụng do lỗi Hyper-V bằng cách sử dụng Gpedit (Local Group Policy Editor) để tắt Device Guard (còn được gọi là Credential Guard).
Hóa ra, sự kết hợp giữa phần mềm và dịch vụ liên quan đến doanh nghiệp hướng tới bảo mật này có thể dẫn đến xung đột với một số tính năng của VirtualBox VM. Nếu đây là thủ phạm đằng sau VERR_SUPDRV_NO_RAW_MODE_HYPER_V_ROOT, bạn có thể giải quyết vấn đề một cách dễ dàng bằng cách tắt Device Guard thông qua Local Group Policy Editor.
Nhưng hãy nhớ rằng không phải tất cả các phiên bản Windows đều có các tiện ích Gpedit theo mặc định. Windows 10 Home và một số phiên bản phụ liên quan khác sẽ không bao gồm nó. Tuy nhiên, bạn có thể thực hiện các bước để cài đặt gpedit.msc trên Windows 10 .
Khi bạn đã đảm bảo rằng Local Group Policy Editor có thể truy cập được trên phiên bản Windows của mình, đây là hướng dẫn nhanh về cách tắt bảo vệ thiết bị:
- Nhấn phím Windows + R để mở hộp thoại Chạy. Tiếp theo, gõ 'gpedit.msc' rồi nhấn Enter để mở Local Group Policy Editor .

Lưu ý: Nếu bạn được nhắc bởi lời nhắc UAC (Kiểm soát tài khoản người dùng) , hãy nhấp vào Có để cấp đặc quyền quản trị.
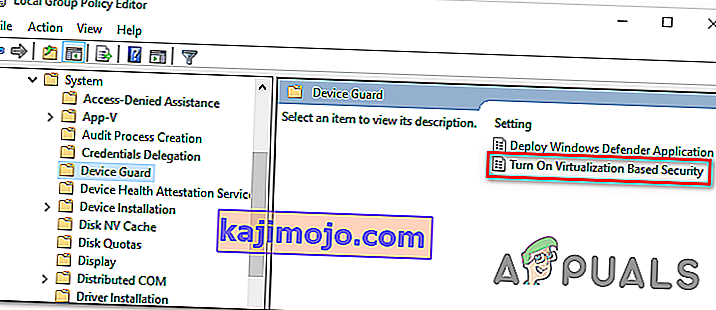
- Once you’re inside the Local Group Policy Editor, use the left-hand side menu to navigate to the following location:
Local Computer Policy > Computer Configuration > Administrative Templates > System > Device Guard
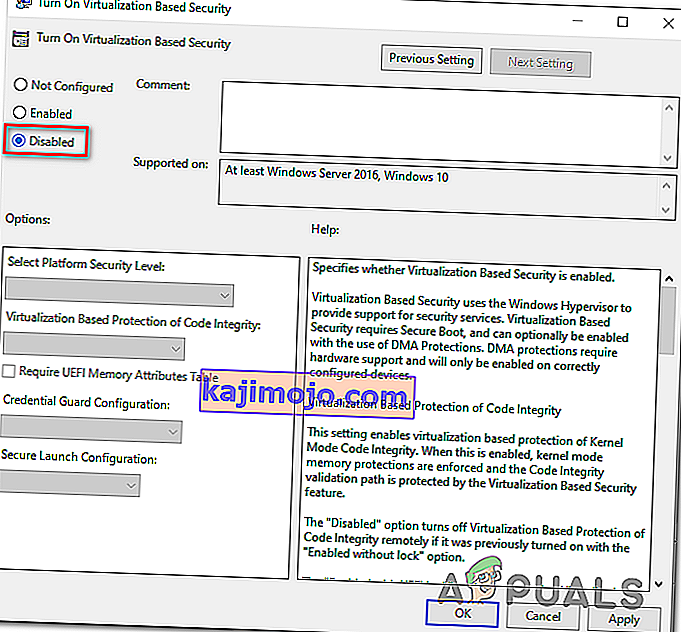
- After you manage to arrive at the correct location, move over to the right-hand section of the Gpedit utility and double-click on Turn on Virtualization Based Security.
- Once you’re inside the Turn On Virtualization Based Security window, simply change the status to Disabled and click Apply to save the changes.
- After you manage to do this, DO NOT restart your computer yet. Instead, open up an elevated command prompt by pressing Windows key + R, type ‘cmd‘ and then press Ctrl + Shift + Enter.
Note: When you see the UAC (User Account Control) prompt, click Yes to grant the CMD terminal admin clearance.
- Inside the CMD window, paste the following commands and press Enter after each one to delete the related EFI variables that might still cause this problem:
mountvol X: /s copy %WINDIR%\System32\SecConfig.efi X:\EFI\Microsoft\Boot\SecConfig.efi /Y bcdedit /create {0cb3b571-2f2e-4343-a879-d86a476d7215} /d "DebugTool" /application osloader bcdedit /set {0cb3b571-2f2e-4343-a879-d86a476d7215} path "\EFI\Microsoft\Boot\SecConfig.efi" bcdedit /set {bootmgr} bootsequence {0cb3b571-2f2e-4343-a879-d86a476d7215} bcdedit /set {0cb3b571-2f2e-4343-a879-d86a476d7215} loadoptions DISABLE-LSA-ISO,DISABLE-VBS bcdedit /set {0cb3b571-2f2e-4343-a879-d86a476d7215} device partition=X: mountvol X: /d copy %WINDIR%\System32\SecConfig.efi X:\EFI\Microsoft\Boot\SecConfig.efi /Y bcdedit /create {0cb3b571-2f2e-4343-a879-d86a476d7215} /d "DebugTool" /application osloader bcdedit /set {0cb3b571-2f2e-4343-a879-d86a476d7215} path "\EFI\Microsoft\Boot\SecConfig.efi" bcdedit /set {bootmgr} bootsequence {0cb3b571-2f2e-4343-a879-d86a476d7215} bcdedit /set {0cb3b571-2f2e-4343-a879-d86a476d7215} loadoptions DISABLE-LSA-ISO,DISABLE-VBS bcdedit /set {0cb3b571-2f2e-4343-a879-d86a476d7215} device partition=X: mountvol X: /dNote: Keep in mind that X is a placeholder for an unused drive. Adjust the value accordingly.
- After every command is processed successfully, restart the host machine and see if the problem is resolved at the next startup.


In case you’re still encountering the same “Raw-mode is unavailable courtesy of Hyper-V” error, move down to the next method below.
4. Disable Core Isolation in Windows Defender
As it turns out, a security feature from the default AV can also be responsible for this issue. On Windows 10, Windows Defender has a feature colled Core Isolation – it’s essentially an extra layer of virtualization-based security that’s designed to repel more sophisticated attacks.
However, this security feature is known to interfere with the well-functioning of virtual machines (especially the ones facilitated by 3rd-party alternatives.
Several affected users that were also encountering the “Raw-mode is unavailable courtesy of Hyper-V” error have confirmed that they were finally able to fix the issue by enforcing some modifications that allowed them to disable Core isolation from the settings menu of Windows Security.
Here’s a quick guide on disabling Core Isolation from the settings menu of Windows Defender:
- Press Windows key + R to open up a Run dialog box. Next, type “ms-settings:windowsdefender” inside the text box and press Enter to open up the Windows Security tab (former Windows Defender) of the Settings app.

- Once you’re inside the Windows Security tab, move over to the right-hand section and click on Device Security under Protection areas.
- Next, scroll down through the list of available options and click on Core isolation details (under Core isolation).
- Inside the Core isolation menu, ensure that the toggle associated with Memory integrity is set to Off.
- Once the modification is enforced, restart your computer and see if the problem is fixed at the next startup.


In case the toggle associated with Core Isolation is greyed out or you get an error message when you try to set it to OFF, here’s a quick guide on achieving the same result via Registry Editor:
- Press Windows key + R to open up a Run dialog box. Next, type ‘regedit’ inside the text box and press Enter to open up Registry Editor. Then, click Yes at the UAC (User Account Prompt) to grant administrative privileges.

- Inside Registry Editor, use the left-hand section to navigate to the following location:
Computer\HKEY_LOCAL_MACHINE\SYSTEM\CurrentControlSet\Control\DeviceGuard\Scenarios\CredentialGuard
Note: You can either navigate there manually or you can post the location directly into the navigation bar and press Enter to get there instantly.
- After you manage to arrive at the correct location, move over to the right-hand section and double-click on the Enabled key.
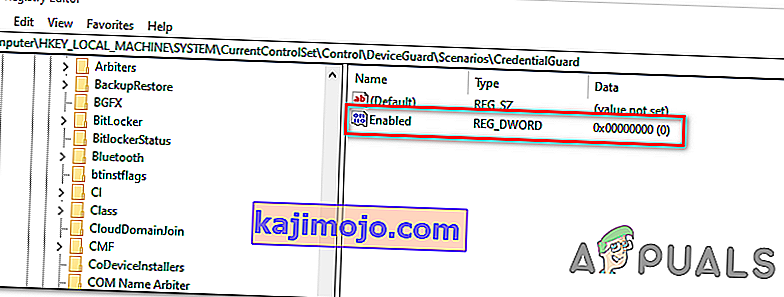
- After you manage to open the Enabled Value, leave the base to Hexadecimal and change the Value data to 0.

- Click Ok to save the modification, then close Registry Editor and restart your computer to see the changes.
- At the next machine startup, repeat the action that was previously causing the VERR_SUPDRV_NO_RAW_MODE_HYPER_V_ROOT error code and see if the problem is still occurring.


In case the issue is still not resolved, move down to the next potential fix below.
5. Enable Virtualization in BIOS or UEFI
Another potential reason that might cause this problem is an instance where hardware virtualization is disabled from BIOS or UEFI settings. Keep in mind that virtualization is enabled by default on every piece of new hardware nowadays, older computer configurations might not have this option enabled by defaults.
If you have an older PC configuration, you might need to enable hardware virtualization manually from your BIOS or UEFI settings. Several affected users have confirmed that the issue was completely resolved after they did this.
Here’s a quick guide on enabling Virtualization from your BIOS or UEFI settings:
- In case you have a BIOS-powered computer, start it up and start pressing the Setup key repeatedly as soon as you see the startup screen. With most configurations, the Setup key is either one of the F keys (F2, F4, F6, F8) or the Del key.
 Note: If you’re using a UEFI-based computer, follow the steps (here) to boot directly into the Advanced Startup options menu. Once you’re there, you can access the UEFI firmware settings directly from that menu.
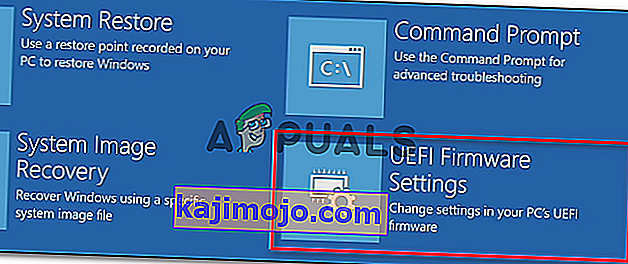
- As soon as you land in your BIOS or UEFI settings, start browsing the menus to find your motherboard equivalent to the virtualization technology (Intel VT-x, Intel Virtualization Technology, AMD-V, Vanderpool, etc.)
- When you manage to locate it, ensure that you set it to Enabled.
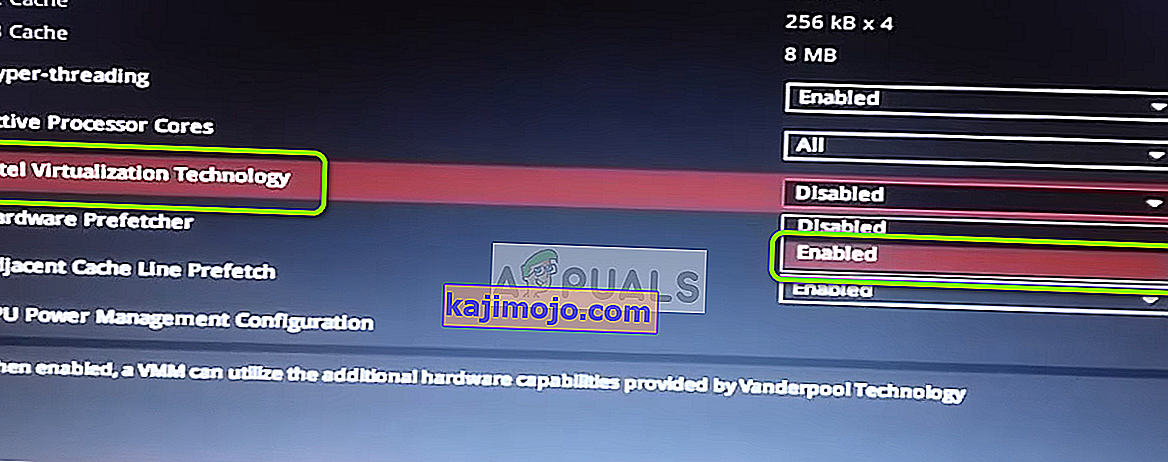
Note: In most cases, you will find this option under Processor, Security, Chipset, Advanced, Advanced Chipset Control or Advanced CPU configuration. But keep in mind that your screen might be wildly different from ours depending on the motherboard that you’re using and the CPU manufacturer. In case you’re not able to find the option by yourself, search online for specific steps according to your configuration.
- After you manage to enable the virtualization technology, save the changes you made to your BIOS or UEFI settings and restart your computer to allow it to boot normally.
- At the next startup sequence, repeat the action that was causing the “Raw-mode is unavailable courtesy of Hyper-V” error and see if the problem is now resolved.
 Note: If you’re using a UEFI-based computer, follow the steps (here) to boot directly into the Advanced Startup options menu. Once you’re there, you can access the UEFI firmware settings directly from that menu.

In case the same problem is still persisting, move down to the next potential fix below.